60s Makeup Tutorial: Mod Inspired Look

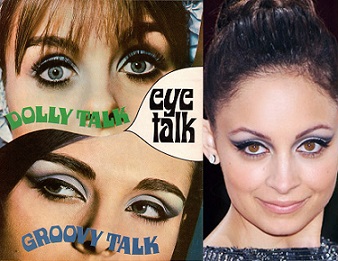
A 60s makeup look is really all about the eyes...
This mod makeup look has definite obvious characteristics. These were contrasting colors, black crease, dramatic eyelashes, and thick luscious eyeliner.
You choose for yourself as to how dramatic and how far you’d like to take them, according to your own preferences and the occasion.
Your 1960s Makeup Pouch:
Primer (optional)
Your choice of foundation
Concealer (optional)
Eye shadow (white, and/or any bright color of your choice)
Pencil eyeliner or black/ dark eye shadow of your choice
Gel, cream or liquid eyeliner
Eyeliner brush
Eyelash extensions (optional)
Lash lengthening mascara
Eyebrow brush
Neutral blush (one that most naturally mimics your natural coloring) (optional)
Blush brush
Foundation
With foundation, you want to create a fresh, clean face. So you can start with a luminising primer if you want the makeup to stay longer and add a touch of a glow to your face.
Next, apply foundation using whatever tool that you prefer. Applying foundation is still governed by basic rules even for this 60s makeup look…
Dramatic 60s Eyes
The eyes are where all the 60s makeup magic happens. They are going to be the main focus of your makeup.
Start by applying a white eye shadow over the eyelid. This white shadow will contrast well with the black liner, in the classic mod spirit.
To tone down the makeup, you can opt for a neutral shadow. Sweep this over your whole lid. If you’d like go bolder, you apply any bright makeup of your choice. Perhaps your favorite blue or purple.
The most important 60s makeup tool has to be Eyeliner!
Apply black eyeliner on the lash line carefully. For better precision, start on the outside of the lash line, and then work your way inwards. I’m not sure why, but I find that this makes it easier to apply the liner in a clean, straight line.
You then layer a few more times so that it’s quite a thick line. A liquid, cream, or gel liner will be the most precise. You can also use well sharpened kohl eyeliner.
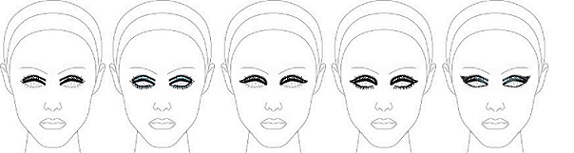
The next step is to darken your crease. Here you will use any dark shadow of your choice. Your dark browns, grays, and dark blues give this mod look a bit more polish.
For a more intense effect, use either the black eye shadow or liner and a firm eye shadow brush..
Trace a line just above and along your crease. Start at the corner of the eye, and follow the crease line. Then blend or smudge the liner upwards along the crease. You want to end up with a thick, smudged line that makes your crease look a little deeper.
If you’d like to change it up and be more dramatic, create a cat eye. Flick the liner upwards in the direction of the end of your eyebrow. Then, extend the crease line in the same direction.
For the open eyed effect, run white or fleshy colored eyeliner along the bottom waterline. For darker skin, run a light brown or a dark fleshy color. This looks most natural as white liner doesn’t do dark skin much justice.
If you prefer, you can line the bottom lash line, including the waterline, and make the liner as thick as you’d please.
For the lashes, you have two options. You can either use lash extensions, or lash lengthening mascara. Use about two to three coats of mascara on the top lashes.
The bottom lashes that were made famous by Twiggy’s 60s makeup look, were painted on, and can be done using eyeliner, but without lining the bottom lash line.
This is a bit too extreme for most people, unless you’re dressing up in a mod theme. For more everyday wear, you can turn to a classier, more versatile version of this.
A more updated version of painted 60s makeup lashes is to use lash lengthening mascara on them. Use just the tip of the mascara wand. This is how you’re going to color and lengthen the lashes without darkening the lash line.
This way you can wear it for a glitzy evening, on a night out, or even to work.
So you can go as dramatic or as muted as you’d like. Add more dimensions using different blush colors.
Barely- There Blush
Blush should be barely there so that the focus is purely on your eyes. You can even get away with using no blush if the makeup is sheer enough.
So swish on a little bit of a neutral blush. This blush is one that’s barely there, but there… It’s the color that would come up if you blush, in a small amount.
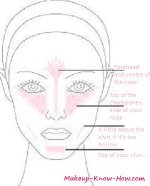
The effect is that you don’t look like you are actually blushing, but like you’re simply youthful. Use a synthetic brush because it helps you to tone down on the color. Here’s a little guide to show you how to apply blush for your face shape.
Neutral Lips
Lips for a 1960s makeup vibe are toned down and soft. Use a neutral lip color. This is a color that most readily looks like your lips. A lot of people tend to think that neutral means that it’s the same as your skin. This sometimes looks way unnatural.
So rather opt for a lipstick that matches your lips. Even just a tinted lip balm or gloss that’s been toned down will work.
The key to making your lipstick stay is blotting. Apply the first layer, and then blot it with tissue. Do this with about four or five layers then apply the final coat.
Another blotting technique is to place 1 ply of tissue on the lips, then dust with baby powder, or loose or pressed powder. Do this between those four or five applications. I promise your lipstick is going to last so much longer…
Now go out and paint the town with that 60s makeup look!
Makeup Know How Home › Vintage Makeup › 60's Makeup: ModDidn't find what you were looking for? Search this site...
Sign up for continuously putting your best face forward with our monthly e-zine...:)
Recent Articles
-
Eye Make Up Tips For Your Eye Color
Mar 13, 15 05:19 PM
Eye Make Up Tips: How to do eye makeup that works with your color profile! -
Contouring Makeup and Highlighting Tips For Any Face Shape
Mar 13, 15 05:06 PM
 Use contouring makeup to really sculpt your facial features!
 -
Concerns About Lead In Lipstick?
Dec 30, 14 11:42 PM
Lead in lipstick is a great concern for makeup lovers. Here's how to go about deciding on the safety of lipstick…