Apply Your Foundation Make Up With a Few Easy Techniques...

So you've found a befitting foundation make up formula among the thousand and one foundation tubes out there. Whether it's a simpler mineral foundation formulation, or the porcelain perfecting airbrush foundation.
If you haven't, there are just a few things to consider to find the best foundation make up for your type of skin... Then you've mastered the quickest(not to mention affordable) way to advance your looks!
Here you will get familiar with the application methods for basic foundation types.
This will help you apply it in the most flattering way possible....
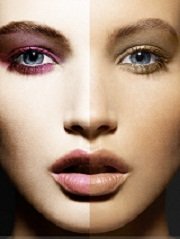
Ideally, your best foundation will even out your skin tone.
As opposed to masking your skin completely.
It's a base for your blush, eye, and lip makeup.
It takes your look from naturally beautiful to 'naturally' georgeous!
The goal is to create the healthy look of well nourished skin. Different application methods will give you different results each time...
If you already have even toned skin, I dare say you probably don't need it...Perhaps just tinted moisturiser will do, or a spot here and there of concealer. Nothing is cast in stone.
When several people (including random strangers in the fresh produce aisle) comment on what great skin you have...
' Oh my gosh your skin... whad-u use...? Genes? Oh you're so lucky...' ;)
That will be the ultimate confirmation of success in your foundation make up quest!
The journey to smooth, even toned skin starts here.
Start With A Primer - The Best Foundation Make Up Base
This is a pre-foundation step, after you've taken care of your skincare and grooming. A good primer smooths skin out. It helps the foundation stay longer because it prevents makeup from disapearing. People with smooth 'pore less' skin don't need it.
If you, like me, feel like your pores get way too much breathing space though, ensure that you use primer as a filler. A well prepared canvas may become an essential step for you...
Cover Up Blemishes With Concealer
Look in the mirror. What do you consider to be your biggest 'problems'? No Problem. You're going to deal with those first.
Concealer is the foundation complement. This is because it helps cover major blemishes. You then might need much less foundation than you thought.
So first deal with problems spot on...
Conceal dark cicles under eyes
For problems such as rosacea you might need to look into something with more coverage, such as airbrushing, or camouflage makeup.
Nothing left to hide? Yay! most of the work is done.
The Best Foundation Make Up Application Techniques
You have begun by assessing your skin for what it craves, and the purposes for which you might need foundation. For example, oily skin needs an oil free formula or powder foundation, as opposed to dry skin. When skin is dry it needs a liquid foundation with drought quenching benefits.
More mature skin will need age defiers like antioxidands and wrinkle smoothers.
Sometimes your work requires looking good AND sweating or braving bad weather. Then you might want want to look at a waterproof foundation makeup or long wear makeup.
Don't think too much about these or else you might get overwhelmed. Give it a brief (but thorough) thought. Then head on to the beauty counters with the confidence of a pro.
Use different tools depending on the occasion, or look you're gunning for...
Liquid/ Cream Foundation Make Up
 |
Pour/scoop a little bit of foundation onto the back of your hand for easy access, and to warm it up a bit before application. Liquid and cream foundations are best for a normal makeup routine, and also for contouring. There are three tools you can use for this. |
- Your gentle and warming fingers, give you medium coverage, although they're not very precise.
- A damp sponge or beauty blender gives you less coverage, but more of a natural, dewy finish.
- For maximum cover, you can use a brush.
It's also okay to mix 'em up as you please. So for example, If you want good coverage in a natural finish,you'll start applying your makeup with a brush. Then you take a damp sponge and start dabbing all over for more of a dewy look...
Dabbing liquid foundation on cheeks, forehead and chin before blending is a bad habit. It doesn't make it into the best foundation 101 syllabus...
Rather apply a section at a time. Maybe cheeks, then forehead, etc. That way, there's no need to rush blending before anything dries!
Using Fingers Or A Sponge:
Start wherever you want on your face. Blend over the surface..
No rubbing please... you want it to go ON rather than INTO your skin.
Motion in the natural skin direction until there are no streaks. Please pay attention to the often neglected area around the nose, and ear/ jawline.
Foundation over the eyelids is sometimes debated(not by me...). I prefer to put it there because it gives an even texture on the eyelids. It also gives your eye makeup something to stick to. Plus not putting it there can just make you feel incomplete... Doesn't it?
FOUNDATION MAKE UP TIP: Brush translucent powder over liquid foundation to set it. It keeps the foundation on so that it doesn't disappear into oily skin. Great for touchups without adding more colour! If your skin is darker though, rather stick to your one that's the same as your skin color...
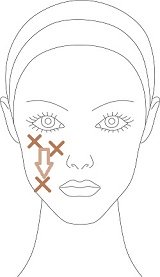
When Using A Synthetic Brush:
Dab it in the foundation off your hand, and start by making little x's on your face, then blending down.
Do this all over your face, making sure to also get it onto the crease of your nose ... It's so often neglected...
A stippling brush can also give you very good, airbrushed results. You dab the foundation over your face, and then blend it out in circular motions. When you do this, use feather light movements... As if you don't really want to touch your face, just glide over it...
Powder/ Mineral Foundation Make Up
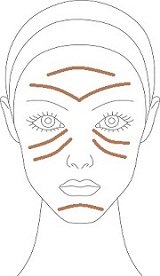
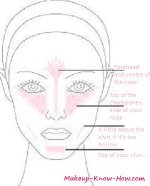
Using a powder brush like( e.l.f. Gem Powder BrushSweep in similar sections of your face as the brush demonstration above until your face is evenly covered.
You may also use cicular motions and see which ones work better for you.
Good brushwork starts with NOT loading it with powder. Apply powder only on the tip of the brush, then make sure you're not pressing the brush onto your skin when applying. Just lightly swishing it on...
Tip for powder users: loose/ compact powder tends to give an all over matte complexion. To add a bit of a 'natural' glow use the best highlighting foundation you can find, or add luminizer where needed..
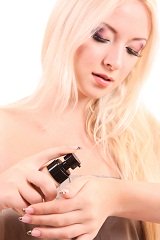
Spray On Foundation Makeup
Now spray on foundation, should not be confused for airbrush foundation. It's a bit messier to apply because it's really just normal(thinner) foundation dispensing from a spray bottle.
So start by tying back and covering your hair.
Shake (the bottle...), Then spray in a z shape across your face from about 5 inches away. This should take you about 3 seconds!
Hmm, that was quick...
It may be uneven so it's best to touch it up. Do this by spraying a bit of the foundation makeup onto a flat tipped makeup brush, then brushing out uneven areas such as the nose area. Then you're done!
This is not the best foundation make up for precise coverage. It's super light, and the application doesn't pinpoint blemishes if you don't use a brush.
If spraying is too messy for you, rather just spray onto the brush and apply with brush strokes similar to those above.
Spray on foundation make upTip: Most spray on foundations will need a primer beforehand, and remember- LESS IS MORE!
Airbrush Foundation Make Up
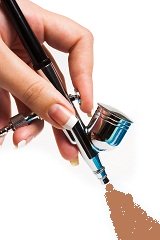 |
Most airbrush makeup systems come with an instructional dvd, but let's go through it just in case! With airbrush foundation a little goes a long way. Once you've mixed your perfect shade, let the porcelain perfection begin... With the compressor at the right pressure, feel the air flow, block it with a piece of tissue, and pull the lever. |
The bubbles show you that the colours are a'mixin. Then start moving the nozzle around. Spray the foundation on the tissue- just to make sure it's spraying evenly.
Start with any blemishes that you want to zoom into and wipe out! For this the nozzle is about 1- 2 inches away from the trouble spots.
Start moving it in circles before you gently flick the lever, to keep the product at a minimum. Don't wait until you see foundation on your face. This is a sign that you've applied too much. Remember to keep your eye on the area you're spraying, and always keep moving if you want even distribution...
The most effective technique is always to layer bit by bit.
Stop when you see the previously blemished area looking like the rest of your face. Again, don't wait to see foundation, because then you've done too much!
Move the nozzle about 5 to 6 inches away from your face, and start spraying the rest of the face always in a circular motion. When you get to creases like in the eye area, open them up and let some product colour them in.
Don't forget to keep moving, or you'll end up with nasty blotchy splatters all over!
When you see clear skin all round, stop.
Admire your good work...
...and continue with the rest of the makeup application:)
Airbrush Tip: If you feel some dry areas after application, apply some of the luminizer that comes with the airbrush package
Makeup Know How Home › Apply FoundationDidn't find what you were looking for? Search this site...
Sign up for continuously putting your best face forward with our monthly e-zine...:)
Recent Articles
-
Eye Make Up Tips For Your Eye Color
Mar 13, 15 05:19 PM
Eye Make Up Tips: How to do eye makeup that works with your color profile! -
Contouring Makeup and Highlighting Tips For Any Face Shape
Mar 13, 15 05:06 PM
 Use contouring makeup to really sculpt your facial features!
 -
Concerns About Lead In Lipstick?
Dec 30, 14 11:42 PM
Lead in lipstick is a great concern for makeup lovers. Here's how to go about deciding on the safety of lipstick…