Contouring Makeup Doesn’t Have To Be So Scary...

Contouring makeup is used to highlight and shade your face as if you're really working on a piece of art... You do this in a way that makes you look like you have the most perfect bone structure possible for you!
It’s basically a way to almost ‘sculpt’ your face into a more chiseled version...
What do you get at the end of all this?
- Higher cheekbones
- A slimmer nose if you want one
- A more defined face shape
This is not something you should do everyday because oh the time!
It’s really good for weddings and other occasions where you’re going to be taking a lot of photographs...
If there had to be a contouring makeup tv show, It’d be called “extreme makeuping”!
It could also be called be considered a form of art really... It's probably why the whole industry is "makeup artistry"..
It looks a bit overwhelming, but if you follow the most important rule...
"Blend Blend Blend"
Well then it's just art:)... You'll be very proud of yourself when you're done!
Throughout the process, just keep checking yourself to see if you've done enough. You can choose to stop at highlighting, or just do the shading. Really it’s up to you to decide how far you want to take it…
You can go wild and use the whole contouring makeup guide, or you can be more conservative and choose to keep it more simple.
This is especially useful if you’re at either end of the complexion spectrum.
If you have super light, pale skin, rather stick to a highlighter and shade(Which I explain more about lower on the page). If you have super dark skin, just do the light foundation with highlighter...
Before You Begin With Contouring Makeup Process
Start by applying a thin layer of foundation or tinted moisturizer that matches your skin all over your face.
This is just to even out your skintone on areas with no highlight or shade.
It's better to use cream or liquid products for contouring because they blend so easily...
especially if you're not exactly a blending 'pro'.
Blending means: blurring out the color of your makeup, so that no edges or lines are evident. It's the key to a natural looking finish.
You do it in fluffy circular motions, or in little dabs and sweeps with a sponge. It's not complicated or difficult. If you think you've done enough blending, blend a little more than that, and you'll be good to go!
The Way To Placing Highlights...
What You’ll Need
- Matte Foundation/Concealer 1 or 2 shades lighter than your skin.
- Small stippling brush or a damp sponge
- A smaller concealer brush or eyeshadow brush for the nose
- Highlighter ( If you’re using powder foundation, you have to use a powder highlighter. Otherwise your makeup will be cakey…)
Now Apply The Foundation/Concealer...

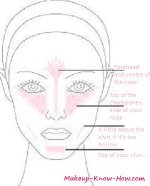
- Under your eyes just across the cheekbone up to your temple, and on the sides of the nose. It goes beyond the end of the eye because that is where the cheek bone goes. Fell that bone under your eye to know where exactly to stop. The goal is bring that bone forward...
- A thin line along the middle of your nose towards your forehead. This makes your nose bone come forward to look a little pointier...
- Then take it up to the center of your forehead if you have a low hairline/ short forehead. Making it lighter will make it look longer... For a high hairline, don't apply it there...
- On your chin if it's stubby. If you have a long face, i'ts not advisable. Only do this if you want to elongate your face...
Be light handed with the product so that it'not too much...
Then blend it out either with your sponge, or a big fluffy brush so that you end up with no dividing lines on your face.
Follow up with some highlighter to make that area a lot more dynamic when it gets hit by light.
If you're white as white can be, just apply highlighter...
So whatever color you are, you can stop here if the light areas are enough for you. Otherwise, move on to lowlights...
Apply The Lowlighting Contouring Makeup Shade
What You’ll Need
- A matte foundation 1 or 2 shades darker than your skin. ( It has to have a muddy look/ cool undertones. Bronzer is too warm to shade and tends to look unnatural...)
- A big stippling brush or powder brush
- A smaller concealer brush or eye shadow brush for the nose
Where To Place The Contouring Shade

- Under the cheekbone from your ear. Stop in line line with your nose and middle of the eye. If the shade goes beyond that it tends to look unnatural.
- If you want to sharpen your nose, draw lines on either side. Actually place it on the parts of your nose that you don’t want to stand out. So it can be a thin, or a thicker line depending on how wide you want your nose to seem… (I actually don’t know why people always want slimmer noses! I wish I had a bigger one. People with bigger noses breathe in more air. As a result their bodies and brains get’s more oxygen and they think faster than the rest of us…)
- Then imagine an oval around your face, and shade anything beyond that oval.
Shading is different for varying face shapes because ideally, you shade according to how you want your face to look.
So for example, if you have a square face, and you want it look a little more oval, you’ll shade the sides of your forehead, and your jawline… If it's long, and you want to make it shorter, you'll shade the forehead, and under the chin.
So really shade according to the face you have already..
After applying the lowlights, blend again all over the face with a big brush or your sponge...
Follow this up by adding blush that flatters your face shape to this contouring makeup routine...
Makeup Know How > Finding Foundation > Contouring MakeupDidn't find what you were looking for? Search this site...
Sign up for continuously putting your best face forward with our monthly e-zine...:)
Recent Articles
-
Eye Make Up Tips For Your Eye Color
Mar 13, 15 05:19 PM
Eye Make Up Tips: How to do eye makeup that works with your color profile! -
Contouring Makeup and Highlighting Tips For Any Face Shape
Mar 13, 15 05:06 PM
 Use contouring makeup to really sculpt your facial features!
 -
Concerns About Lead In Lipstick?
Dec 30, 14 11:42 PM
Lead in lipstick is a great concern for makeup lovers. Here's how to go about deciding on the safety of lipstick…