Eye Makeup Application Made Easy

The thought of getting your eye makeup application wrong may have you giving up- long before you've even started!
Here you’ll find a step by step guide on make up for the whole eye area. From eyebrow shaping to creating illusions according to your eye shape, and everything in-between.
Personally, the eyes are like a mental stability meter for those who know me well.
Smokey and complicated means I was stressed, but now I'm fine, while a bright simple line means I'm calm and focused. So the idea is, if eye makeup can express the inner self so well, can it change us from the outside in?
Answer: Yes, although only temporarily so...
Simple eyeliner can send a woman from tired housewife to sizzling siren in minutes.
Makeup is a much better alternative to plastic surgery especially for those who like to change their minds about their looks a lot.
When I was younger, I used to think my lips were too big, but as sexy developed a new meaning in my eyes, they couldn’t be big enough!
So learn how to make tiny eyes wider, or brown eyes green (just joking, if only though...) by first knowing your eye shape and type. Then use our guides and tutorials to achieve the desired effects!
Do You Really Need Eyebrow Makeup?
Sparse, thin, and light eyebrows will need it for more definition.
Full and dark lashes probably just need to be shaped as they are already defined.
The eyebrow shaping process can be scarring to a girl's eye makeup routine.
It's comforting to know though, that they DO grow back...
...Most of the time...unless you've undergone a few too many waxing or... threading sessions... or other.
So rest assured that through all the bald eyebrow incidents and patchy mistakes, you have finally found a place to make sense of it all.
Some people feel like they’ll never be able to do it right at home. At other times, you just want to outsource the dirty work.
Professionals, on the other hand, insist that no-one should shape their brows at home-lest they put them out of business... Okay, that’s not the reason they give ;).
So for those who feel like that, the best thing would be to hand over this part of eye makeup application to a professional . That way all you have to do is maintain every now and then. Here are some tips for brow maintenance by plucking...
Other eyebrow shaping options that you may find at salons are eyebrow threading and waxing.
Yes, pain is the name of the game! The less painless method would be the good old razor, but it’s a LOT of maintenance, so a little bit of pain can be worth it, considering the time you save.
A tip for painless brow plucking?
Wet a facecloth with hot water and press it to the brow area before plucking. This opens the pores and allows for the cuticle to come out smoother. Place the tweezers in warm water before plucking then pluck in the direction of the hair.
What you don't want to do though, is opt for normal shaving razors. Nor should you use depilatories that can burn the sensitive skin around that eye area...
We have a whole eyebrow shaping section to get you on the road to that perfect brow...
A Splash Of Eye Shadow For Color

Hmm eye shadow... Now this is one potentially scary topic for eye makeup application . Let’s not count the many ways we’ve seen it go wrong!
The thing with eyeshadow is, its soo difficult to know whether those looks you’re being flashed are from admiration or just plain shock...
‘How could she do that to herself?’
Eye shadow is fun and an expressive tool to use on the eyes. Color is always fun to work with because it’s almost like a release for whatever emotions you may be feeling on any particular day. Even better, it can be used to express the way you’d like to be feeling for an event or whatever you might be heading for.
There are basic color rules that create certain effects on eyes. Light color opens up the eye, while dark will shrink it. Then there is the type of eyeshadow you use. Cream eye shadow will most likely settle into fine lines, while powder will not.
A more creamy shadow is richer than powder. Then there's the choice between pricey, or budget shadow. An eye shadow is worth a splurge if you want one with more pigment. This is because your eye makeup will last longer on your skin, and you will apply less of it for the same effect as a budget one.
 |
There’s a classic guideline for this eye makeup application process. You will start with two basic colors. A light color that is slightly lighter than, or the same as your skin color. Then a medium or dark color in whatever range you choose. |
You can stop there, or add a third, dark color for a more intense look.
Usually if you buy a two or three color eye shadow palette to begin with, you’ll find that the colors are different shades of one color, or they are classic complementary colors like blue and brown... So they'll already be put together for you.
To apply general eyeshadow, you will find a comprehensive eyeshadow tutorial helpful. This is especially if you're looking for a starting point in your eye makeup application routine.
For eye makeup application tips according to different eye shapes, there are tried and tested methods..
The Last Eye Makeup Application Stop Is Come Hither Eyelashes...
Now that you’re done with your brows and eyeshadow, the last stop in your eye makeup application routine will be eyeliner and mascara.
They're quick ways to jazz up the eyes and make them stand out a little more. A little effort here pays off big time.
Eyelash tip: To avoid losing focus or poking yourself, make sure to look into the mirror at your eye. DON'T try and look at whichever tool you’re using...
The most common and available eyeliner is pencil eyeliner. There is also liquid, kohl, and gel eyeliner. They’re more rich and concentrated than pencil eyeliner. As time goes on more variations are popping up as you read this(Maybe)...
The best way to apply eyeliner? It depends on the occasion and the final effect you want.
For Everyday, Barely There Eyeliner
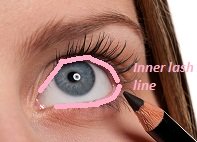
Using shaved pencil eyeliner, you are going to line the inner lash line.
Lift your upper eyelid to expose the underside of the lashes. Line the dry area barely below the lashes (hey, don’t blink). Done? Now you can blink. Then do the same with the lower lashes, lining just above them. This is called tightlining.
Avoid lining on the bottom inner corner of the eye, because that’s where the goop collects if you’ve had eyeliner on for a while...
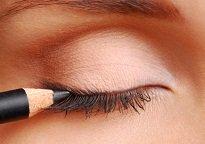
If you prefer more visible liner, start by tightlining.
Then line just above/on the lashes in little strokes. Smudge this initial line into a bit of a shadow with your fingers, or preferably a brush. Then draw a second line carefully along the lashes in a solid line, making sure to put it right on the lash line without any patches left undone.
For the bottom lashes you can line just the inner lash line as above, or draw along the lash line with the smudging technique.
If you’re looking to add a little grrrr... you can just draw another line and extend it a little beyond the outer edge of the lash line towards the end of your eyebrows.
Making the line thicker on the outside gives you the winged eyeliner effect.
Mascara To Finish Off The Look
Mascara is one option for lengthening your lashes without extensions. To apply mascara, you want to avoid the lashes clumping together or getting thick globs on that make lashes look heavy.
So twirl the wand out of the tube without pumping. If there’s too much product on it, just scrape it off on the edge of the tube, or blot it gently with a tissue.
Place it at the bottom of your lashes, then wiggle onto the lashes, and pull up. The wiggle helps separate the lashes. Then when you brush upwards, you’re coating more individual lashes.
If you have straight lashes and want a bit of a curl, an eyelash curler will do the trick before putting mascara on. There are full eyelash curlers, and smaller ones that take a section at a time.
Start by curling the ends of the lashes at first. Hold for a few seconds, then down to the next part of the lashes under that, and hold. Do this one horizontal line at a time, until you get to the base of the lashes. Just be gentle and don’t pull (and try not to blink while clamping).
With practice, you’ll be able to start at the base of the lashes moving up to the tips.
Check out eye makeup application ideas for more ways to use different eyeliners and mascara. Perhaps in different colours or forms.
If you’re looking into eyelash tinting, this is also more comfortably done by the professionals!
If only because you feel safer if SOMEBODY’s eyes are open throughout the whole process...
Please no quick home jobs. Blindness or ghastly allergic reactions are.not.sexy...
After perfecting your eye makeup application, don't forget to take it off with a good eye make up remover.
Makeup Know How Home › Eye Makeup ApplicationDidn't find what you were looking for? Search this site...
Sign up for continuously putting your best face forward with our monthly e-zine...:)
Recent Articles
-
Eye Make Up Tips For Your Eye Color
Mar 13, 15 05:19 PM
Eye Make Up Tips: How to do eye makeup that works with your color profile! -
Contouring Makeup and Highlighting Tips For Any Face Shape
Mar 13, 15 05:06 PM
 Use contouring makeup to really sculpt your facial features!
 -
Concerns About Lead In Lipstick?
Dec 30, 14 11:42 PM
Lead in lipstick is a great concern for makeup lovers. Here's how to go about deciding on the safety of lipstick…