Eyebrow Threading Tutorial

The allure of eyebrow threading is in it's ancient eastern origins. I always ask myself, how did someone discover that they could do THAT?
You will find here a guide to show you how to do it yourself at home...
The results are as amazing as the method is simple... It's quite fascinating for most of us when we do stumble over it!
Eyebrow threading is an amazing, inexpensive option to waxing or tweezing the brows.
Compared to tweezing, you will be able to pluck more hairs at a time with this method. You will also be able to pull more hairs from the roots, avoiding the breakage that can happen when plucking with a tweezer.
How Does Eyebrow Threading Compare To Waxing?
Well, firstly threading causes less irritation to those with sensitive skin.
A drawback though, is that skin may be irritated from it too when its not done right.
For example, if you're using the wrong kind of thread.
Secondly, it's a much more precise method.
This is because of the control you have over which hairs are uprooted.
Precision though, only gets better with experience. So it's important to practice, practice, practice...
The pain factor! Oh it's quite difficult to explain. When under an experienced hand, you'll find that the experts make it relatively painless. Under beginner hands though, you will be sure to experience a considerable amount of pain...
But don't worry. Just as with most hair removal methods, if you do it often enough, you will find that there'll be less pain in time.
Maybe...
Probably...
:)
Eyebrow Threading Guide
What you'll need:
An arm's lenth piece of 100% cotton thread.
Warm compress to open up your pores for less pain
Miniature scissors ( optional)
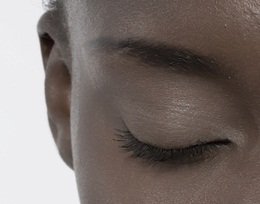
To begin, determine the eyebrow shape you'll be making. If you don't really have an idea of the shape, use the classic eyebrow shaping guide as direction for the eyebrow threading area. Outline this shape using a pencil liner.
If you have very long brow hairs, trim the hairs outside of this line to about 2mm. This is because the longer the hair, the more pain you might feel. The pain is from the thread trapping and tugging at the hair before finally pulling it out of the root.
Knot The Thread
Choose 100% cotton thread because it grips the hair firmer than other materials. It's also going to be much smoother and gentler on the skin than other thread.
For example, the most widely used sowing thread would be the polyester mixtures. This thread is more likely to breaks and cause more irritation. It tends to be less elastic, so it snags the skin during the procedure. This causes little red marks on the skin when threading eyebrows.
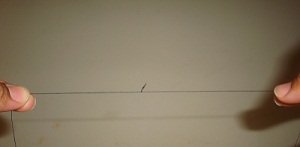
You're going to take the thread and tie the ends together to make one continuous piece.
Finger Placement
Then there are two options of holding the thread going forward.
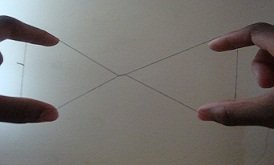
Option A: Hold the thread using your thumb and index finger facing away from you. Using this way, put the two fingers in the thread facing away from you.
Twist it in the middle about 7 to 8 times. You end up with your thumb and index finger from each hand holding up a bowtie shape.
Option B: Hold the piece by inserting all your fingers facing away from you. Now remove both index and pinkie fingers. See which fingers give you comfortable grip and use them.
Twist the string in the middle and make a similar bowtie as above. So using this way, you'll be holding the bowtie shape up with your thumbs, and two or three fingers. This will be your eyebrow threading stance.
Practice The Movement
Now that you've been introduced to the grips, let's see which one you're more comfortable with.
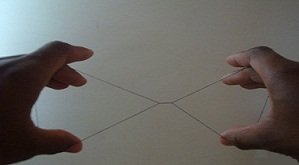
Start by opening and closing the fingers. This is going to create the threading movement. When you open the fingers of one hand, close the other.
You will note that the twisted area in the middle(let's call it the 'twist') moves as you open and close your fingers. This is where the hair will get intertwined, and then uprooted.
Once you've started eyebrow threading, you'll notice that the cotton may hurt your fingers after a while. This happens more if you're letting the thread rest in the crease of your fingers. Rather try and place it in the middle of a fleshy part of your finger to alleviate that discomfort.
Mastering the movements of controlling the twist is very important for the amount of control you'll have. It's what makes the practice an aquired skill. The more practice you have, the better the results.
Your bowtie will usually have differnt proportions. The hair to be threaded goes into a bigger size half, and then as the smaller is being made bigger(opened), the hair gets trapped and pulled out from the roots until the movement stops.
After practicing the movement, try it on an inconsequential piece of hair such as legs. Perhaps very stray eyebrow hairs(less painful).
Now put the thread against the skin, on the area that you'll be working on. Make sure to place the hair in the triangle that will move the twist in the direction opposite to hair growth.
The twist will catch the hair that's in it's way, and very efficiently uproot it on contact. Take a couple of hairs out until you feel comfortable with the control you have.
Start Threading
Now that you've practiced, put the thread up to your brows with your fingers facing away from you. You always thread in the direction opposite to hair growth. Place one of the openings of your bowtie twist at the end of your eyebrow,with your head tilted in the opposite direction as the hair growth.
Lets say you're threading your right brow. You'll then tilt your head to the left . Then place the left side of the bow at the hairs about to be threaded, starting from the outside of the brow.
Open up the hand opposite to the direction of the hair, and carefully guide the thread along the hairs that you want to come out....
Whoa!
The first time I did this, a tear just ran down my face with no warning! But don't worry...the first bit of pain is the most painful that it gets! It almost numbs your face enough for you to finish the whole thing :)
On the other hand though, I think that the tears I shed might have been from the joy of witnessing the very clean area above my brow!
Once you're done, you might want to apply some cooling gel for any irritation that you're still feeling.
Makeup Know How Home › Eye Makeup › Eyebrow ThreadingDidn't find what you were looking for? Search this site...
Sign up for continuously putting your best face forward with our monthly e-zine...:)
Recent Articles
-
Eye Make Up Tips For Your Eye Color
Mar 13, 15 05:19 PM
Eye Make Up Tips: How to do eye makeup that works with your color profile! -
Contouring Makeup and Highlighting Tips For Any Face Shape
Mar 13, 15 05:06 PM
 Use contouring makeup to really sculpt your facial features!
 -
Concerns About Lead In Lipstick?
Dec 30, 14 11:42 PM
Lead in lipstick is a great concern for makeup lovers. Here's how to go about deciding on the safety of lipstick…