Tutorial: How to Apply Eyeshadow

To learn how to apply eyeshadow the right way, takes you halfway through mastering makeup. It’s sometimes difficult to know where to start, and for others, when to stop!
This tutorial will tell about the types of eyeshadow, so that you know firstly what options you have. Then you will know how to choose the right shadow for your skin. Lastly, you will find a step by step method of applying basic eyeshadow.
Eye Shadow Color Types: Matte, Shimmers, and Glitters
Matte eyeshadows have a flat color with no sparkle. The quality ranges by the amount of pigment in the formulation, and whether the shadow has been finely ground or not.
These eyeshadows have the most intense color. The best texture is quite velvety and goes onto your skin very smooth… They work very well for daytime wear. This is because when you go to work or are out in the sunlight, you want your makeup to be subtle and beautiful. Matte colours are also easier to handle when you start learning how to apply eyeshadow for the first few times.
Shimmery hues have a reflective quality. They reflect light and this reflection ranges from subtle, to very intense. These shadow colors are infused with crushed pearlescent pigments. The shadow can be worn during the day and are awesome at night. This is because when you're under dimmer lighting, your eyeshadow must be more intense to be visible.
They’re especially useful for highlighting certain areas of the eye such as the inner corners and under the brows when you still want your shadow to be mostly matte.
Glitter eyeshadows have glitter particles in them. The color is usually less concentrated, while the glitter steals the show! These are not recommended for everyday life unless you’re really going for a showy look. They better suited for occasions where you have to dress up a certain way, and maybe for teenagers with more leeway to be dramatic!
Liquid, Powder, Cream, and Powder Eyeshadow
Liquid eyeshadows usually come in a tube with a brush or foam wand applicator. They can be waterproof or not. So when buying it, check because if it’s not waterproof, sweat and moisture will make it fade fast. Try and find one that comes in a tube you can tightly seal, because it will then not dry out as fast.
The liquid formulation needs a preservative, so it may contain parabens because they’re a cheap and efficient preservative. They are quite a controversial ingredient. They have been linked (in talk) of breast cancer, hormonal interference.
Methylparaben has also been found to interact with UVB rays causing the skin to age faster. We don’t want that, so look for one that is paraben free because the safety of parabens is still being debated.
Liquid makeup of any kind usually has a shorter life span than creams and powders, so keep that in mind when buying. Their shelf life ranges from 1 month to 3 months. If you don’t use eyeshadow a lot buy smaller versions of liquid shadow. Otherwise, opt for cream stick, or powder eyeshadow.
A pro to liquid eyeshadow is that it can contain some wonderful skincare ingredients. It can be moisturizing, anti ageing, etc…
Cream eyeshadow comes in a tub, and in stick or pencil form. The cream can be applied with your fingers, or a brush (we’ll go through the different brushes further on the page). Cream shadow has a rich, well- creamy textureJ. It goes smoothly on the skin and may dry to a powder finish.
There’s more variety of cream eyeshadows- just like there is with liquid shadow. This is a big plus, because you want to get the most value when you buy any product that goes onto your skin.
Cream/gel shadows are very versatile because you can even learn how to apply eyeshadow as liner. They can be lined or spread using different eyeshadow and eyeliner brushes.
Powder Eyeshadows come in loose and pressed powder forms. You can use your fingers, or more precise brushes for application. Pressed powder is neater to use and store than loose powder. Matte eyeshadow is better to use in powder form because you get the benefit of the concentrated pigment. The great thing about powder is that it has longer shelf life than other formulations.
How to Apply Eyeshadow Using Brushes
The first thing is to get the best brush for your eyeshadow type. You have the choice of two brush materials- synthetic and natural bristles. Synthetic brushes are better for liquid, cream and gel formulas. They absorb less of the shadow in the long run. Natural brushes are better at holding on to powder formulas.
This is a comprehensive list of brushes that fulfill different requirements. When you're just learning how to apply eyeshadow, it can be confusing being bombarded with a heap of brushes.
A good sign of a good brush is fluffy, densely packed bristles. Your job is to figure out which ones you really need, and invest in those. These three are listed in order of importance to make your task a little bit easier…
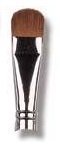
A flat eyeshadow brush for picking up and applying eye shadow- This brush has a slightly square shape at the top. It’s nice and firm with many bristles.
Its main job is to transport the shadow from the jar onto your eye, and ensure that it gets applied to the lid without diffusing the product. If you get a really good one, it will do the next job, which is to blend the colors.
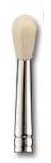
A dome shaped blending brush will blend the colors that you’ve already applied. You will use this to blend the edges so that they melt into each other.
Blending is probably the most important rule of applying color cosmetics. You cannot know how to apply eye shadow without learning to blend. Even if you’re using your finger, it’s important that you never see where one color ends and the other begins.
A crease brush has longer bristles than the others, and has a pointier tip.
The brush makes it easier to apply eyeshadow to your crease, and to blend it.
There are long and short crease brushes. The shorter crease brush will give you a bit more control over application.
How to Apply Eyeshadow Step by Step
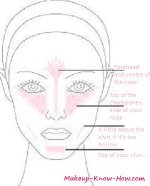
Step 1: Determine your Eye Shape
Start by determining what type of eye shape you have. Why is this important? Because the shape of your eye will determine the best fit eyeshadow. This way, you customize the eyeshadow placement to your own face, even when you want to embrace passing color trends. For example, when you know how to apply eyeshadow to eyes that are too wide apart, you will emphasize the darker, medium color on the inside corners of the eyes. And so it goes…
If you’re pressed for time and are looking for method right now, you can also begin by just applying the general method which I will outline here. Then when you have a few minutes to spare you can go through the method recommended for your particular eye shape.
Step 2: Prime the Lids
This ensures that the eyeshadow goes on smooth and stays on for a long time. Your first, no fuss solution is foundation. The foundation should be one that addresses your skincare needs. For example, if you have oily lids, an oil fighting foundation should help in keeping your lids dry. This will allow your shadow to go on smoother. To kick the longevity of the eyeshadow up a notch, you can rather use a primer over your lids. You can get an actual eye primer especially for your lids, but if you already use primer there shouldn’t be a need to duplicate.
Step 3: Apply the Base Shadow
This is the lightest eyeshadow color you’ll be using. Apply the shadow along the eyelid lid, taking it just a touch above the crease.
If you’re choosing to wear one color, add an extra layer just above the lash line. This is so that the color is concentrated at the bottom, and fades as you go up the eye. Then blend the edges of the shadow with using a brush or your fingers.
Step 4: Apply the Crease Shadow
You’ll apply the second, darker color along the crease with a brush or finger. The best finger for crease application has to be the pinkie... Then really blend this line upwards into a blur.

Once you know how to apply eyeshadow in a basic way, you’ll get more confident with every application. Then you can experiment with eyeshadow on the lower lash line, adding different colors to your repertoire. Maybe even moving into killer smokey eyes ;)…
Didn't find what you were looking for? Search this site...
Sign up for continuously putting your best face forward with our monthly e-zine...:)
Recent Articles
-
Eye Make Up Tips For Your Eye Color
Mar 13, 15 05:19 PM
Eye Make Up Tips: How to do eye makeup that works with your color profile! -
Contouring Makeup and Highlighting Tips For Any Face Shape
Mar 13, 15 05:06 PM
 Use contouring makeup to really sculpt your facial features!
 -
Concerns About Lead In Lipstick?
Dec 30, 14 11:42 PM
Lead in lipstick is a great concern for makeup lovers. Here's how to go about deciding on the safety of lipstick…