Tutorial: How to Apply Eyeliner

Oh yes, it can be scary. If you don’t know how to apply eyeliner, you probably don’t want to take the chance of poking your eyes out, or looking like a hot mess...
Once you’re done with this tutorial though, you might discover that it’s a lot easier than you thought…
We’ll go through the different types of eyeliner.
The most widely available being pencil eyeliner.
This will be followed by cream, gel, and liquid formulations.
Then, you will learn how to apply eyeliner in a simple step by step process…
How To Apply Eyeliner Pencils
Pencil eyeliner is the first thing you should buy after Vaseline! It’s makeup staple, and without it, you cannot even claim to have makeup onJ. It’s to makeup, what milk is to food. Vaseline is the bread…
Now that I’ve digressed, let me pull this conversation into focus…
Pencil liners come in a three level hierarchy.
Let’s start with the most basic and most affordable. This one is the eyeliner that mostly resembles an actual pencil. It’s dry and doesn’t easily impart color. So when you use it you’ll have to add a drop of water to it or, erm- lick it, to make it ‘work’.
When you first shop for eyeliner, maybe as a teen on a budget or just a novice, you will most likely reach for this liner. As I did.
Don’t do it…
Unless your budget is extremely tight, pass on this liner and move on to the next shelf…
How do you know?
Try it out. Don’t just take eyeliner without trying it.
Just open and draw a line on the back of your hand. If it glides on nicely, you can happily buy it.
Sometimes, you’ll even find that a cheaper brand has a better quality liner.
The next level of pencil eyeliner is creamier and goes smoothly onto the skin. It glides on smoothly when you apply it. When you buy a pencil liner, make sure you have a sharpener. This is because you’re going to need to keep it well maintained. Even better and more convenient, get one with a sharpener attached.
I personally don't go for expensive pencils that need sharpening. It has to be cheap if I'm going to sharpen it because they often end up wasted. When you sharpen a creamy, good quality pencil, it'll still break off and most of your money will end up in the bin...
The third, master of pencil liner’s, is one with a twist top. A good quality one is easy to apply. The only downside is that you can't make it pointy for thin, clean lines. For that you'll need one that can be sharpened.
If you’re buying your makeup online, read a few reviews of any eyeliner you’re interested in. People must mention how creamy it is, how it glides on… etc. So if you can’t try it on, just use other people’s experience.
Kohl Eyeliner is a variation in pencil liner. It’s thicker and has deeper color than regular liner.
How To Apply Eyeliner For Tightlining
Pencil liner is the easiest and quickest liner to apply. This is because you don’t need a brush that you must wash afterwards{although you'll need one for perfect blending). It’s also the most versatile finish. You can have natural looking eyes that you can’t really achieve with other eyeliners.
The First method that you have to try, is tightlining. I find that this is probably the easiest and most gratifying method of application. It looks like the most difficult way, but it really is simple if you have the right advice.
For this, use the best pencil liner you can get.
A twisty one is better because even though you can sharpen a pencil, you might still have some wood particles that you haven’t dusted off properly come into the eye.
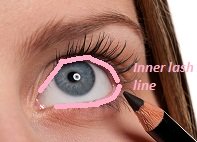
Lift your upper eyelid using your index finger. This exposes the underside of the lashes. Make sure that you're looking directly at your eye in the mirror. This way your body doesn’t make the realization that there’s a slightly pointy thing coming right towards your eye.
You’re then less likely to blink. Line the dry/wet area barely below the lashes, and also go as much as you can on the actual lash line. That’s where your lashes are actually coming out of your skin.
Then do the same with the lower lashes, lining just above and on them. Avoid lining on the bottom inner corner of the eye, because that’s where the goop collects if you’ve had eyeliner on for a while...
How To Apply Eyeliner That Defines And Darkens The Eye Profile
If you don’t have a steady hand, you can use this method to really define your eye. Start by applying the liner as close to the upper lash line as possible. Do this in little short strokes. You don’t have to be too careful.
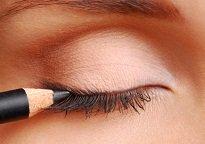
Smudge these initial the strokes into a straight line.
Depending on how thick you want the line to be, create thickness layer by layer. Line into a bit of a shadow with your pinkie, or preferably, a brush.
Then draw a second line. This time, be careful to connect the strokes into one neat line.
Cream, Gel Eyeliner, And Liquid Liner
When you’re looking to create a neater, more defined eye, you can move into cream and gel mascara. They make nicely crisp, clean lines. For these you have to have an eyeliner brush. There are two basic eyeliner brushes. A liner brush and a flat angled brush.
|
e.l.f. Studio Angled Eyeliner Brush |
Liner brushes are pointy and pencil –like. These are even better when bent. This liner mimics the movement and size of a pencil liner. So instead of a pencil liner, you can use this brush to create a thin, intense line. |
|
e.l.f. Studio Small Angled Brush |
A flat angled brush makes a thicker line than a liner brush. It also works double duty for filling in you brows with powder. If you’re going to buy one liner brush, let this be it. These brushes are perfect for most vintage make up applications... |


Liquid eyeliner is thinner than gels and creams so it comes with its own liner brush. Sometimes it comes as a pen. It’s more difficult to use than the creams.
How To Apply Eyeliner Creams, Gels, And Liquids
Using your brush, it’s best to start at the middle of your lash line. From there, paint the line out in short strokes. Layer it until you have a straight line.
Then move to the inner half, connecting the line to where you began. This way you have a little bit more control.

Marcelle Waterproof Liquid DIP-PEN Eyeliner 10H+ |
 e.l.f. Studio Cream Eyeliner |
 e.l.f. Essential Smudge Pot |
How To Create Winged Eyeliner
The key to creating the perfect wing is to start with the body. That is, the main eyeliner line. Once you’ve decided that your eyeliner looks great, you can then wing it!
Let the wing point to the end of your brow, and this will give you dramatic but smiling eyes. Do this rather than a line pointing to your ears, or looking sadly down...
The line should start at a point straight with your bottom lashes, and then flick. Do this line in short, connecting strokes just like you did while learning how to apply eyeliner above.
Apply eyeshadow once you've learnt how to apply eyeliner. Do this using the basic beginner eyeshadow tutorial...
Didn't find what you were looking for? Search this site...
Sign up for continuously putting your best face forward with our monthly e-zine...:)
Recent Articles
-
Eye Make Up Tips For Your Eye Color
Mar 13, 15 05:19 PM
Eye Make Up Tips: How to do eye makeup that works with your color profile! -
Contouring Makeup and Highlighting Tips For Any Face Shape
Mar 13, 15 05:06 PM
 Use contouring makeup to really sculpt your facial features!
 -
Concerns About Lead In Lipstick?
Dec 30, 14 11:42 PM
Lead in lipstick is a great concern for makeup lovers. Here's how to go about deciding on the safety of lipstick…